Forum Replies Created
-
AuthorPosts
-
 Suman M.Keymaster
- Please make sure your task works with “Trigger Once” button properly. If it still doesn’t work with even manual trigger, there might be some other cases for task.
- If your task runs but doesn’t finish or doesn’t provide output log, it might be about memory problem. Please check Memory issues article regarding that problem.
- One of the major problem on background processes is the disabled cron tasks. Starting a task triggers and processes task in the background. This functionality requires cronjob feature. Cronjob is an extension that process anything in the background and it can be enabled on every server or hosting.
You could enable cronjob on cpanel, to enable it please watch the video below :
Suman M.KeymasterYou may experience issues with memory. With enabling error reporting you can determine issue.
Troubleshoot
- Limit your task : With limiting your task Scraper will allocate limited amount of space on memory. You can simply limit your task on project settings, limit section.
- Disable memory limits : If your server already has enough memory resource but your PHP settings limits it, you could simply disable memory limits on plugin settings.
- Gallery images : If your task scrapes too much gallery images, you may limit gallery images to avoid memory issues. With simple xpath expression, you could manage to limit downloading gallery images. Example : [position() < 5] , if you add this expression to end of your gallery xpath, it will only download 5 images.
Upgrading Your Server
If you still get memory errors after the methods above, you should upgrade your hosting. Scraping process requires at least 512 MB RAM. And some shared-cloud hosting companies provides low RAM resource which is not enough for scraping.
Scraper processes tasks with chunks. Meaning that plugin already uses limited amount of resource. If these three methods doesn’t work on your website, you should upgrade your server.
Suman M.KeymasterHere is the basic requirements for Scraper plugin :
1 GB RAM 1 CPU Core 25 GB SSD Storage 1 TB Transfer 40 Gbps Network In 1000 Mbps Network Out We use Digital Ocean’s base server option for testing. The table above captured from Linode.com’s base server.
If you use dedicated virtual cloud server for Scraper plugin, that will be the perfect choice scraping.
The main problem with scraping process, when you use a shared hosting, it will use shared resources. RAM, CPU or network can be used from other customers time to time. That can affect plugin’s performance.
Also these companies provides dynamic IP addresses that can be replaced with an another. And this availability can be useful in any ban or block cases.
So we simply suggest to you use virtual dedicated server. Even small ones will provide very good performances. We currently use Linode and DigitalOcean’s base plans for tests.
https://www.linode.com/pricing
https://www.digitalocean.com/pricing/Also recommended:
PHP Memory Limit: 512M or more
Max Execution Time Limit: 300 seconds or moreSuman M.KeymasterPlugin can track changes on posts and update all parameters with updated values.
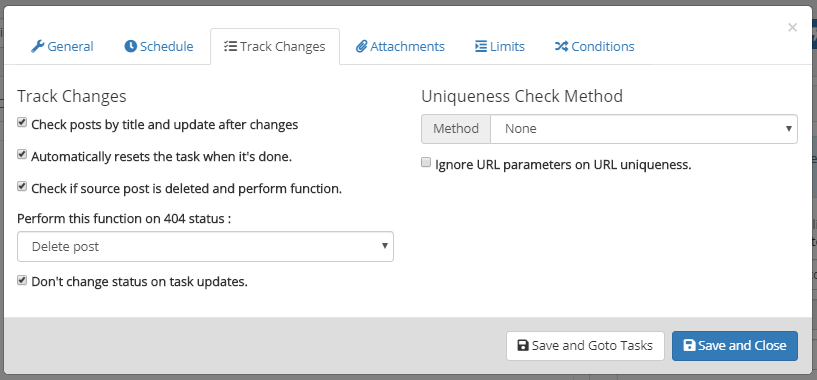
Check posts by title and update after changes
This method checks post by title and update all variables when source changes. This option keeps your posts updated. When source change, plugin scans URL’s and updates content’s value or any custom variable in the post.
Automatically resets the task when it’s done
This option automatically resets when task finished. With this way, plugin will be able to scan all changes from source. If your source continuously adds new posts, this option will be useful. With option, you could scan all pages and track newly added posts.
Check if source post is deleted and perform function
This method performs a function when source post deleted. Source should provide 404 status code to trigger this method.
Don’t change status on task updates
Plugin always updates all values on tracking changes. When something changes, plugin updates all values including “post_status”. If you have a workflow that requires to review your posts before publishing them, you need to enable this option. Because plugin always updates posts statuses to defined value.
Uniqueness Check Method
This method checks the source with defined setting. It catches post with URL, title or product SKU and excludes from process list.
Click here for more info.
Suman M.KeymasterIn Scraper, you could define a default value for data field. To achieve this, simply open to data field’s transform menu, go to shortcodes section. Remove
{{content}}from there. (Please keep in mind that content shortcode provides the value that comes from source. If you remove this, data field simply won’t be providing content for source element.)After deleting content shortcode from template, you could define your own content here.
Suman M.KeymasterSome plugins and themes uses custom taxonomy structures. You could create entries on these custom taxonomies but they should be defined on Scraper correctly.
In this article, we’ll review WooCommerce’s category structure. Plugin’s latest version already covers these taxonomies but it’s very good example for understanding how taxonomies works on Scraper.
Let’s say we need to create a category in WooCommerce’s category structure. In this case, as we normally do, we go to Products > Categories page on WordPress admin panel.
On product categories page, you see that URL provides taxonomy name.

In this case, it’s product_cat.
We’ll be using this value on Scraper to define custom taxonomy to system. Create a data field on Scraper and select “tags_input” for data type. We select this type because WooCommerce stores categories as a WordPress tag.
And we should also define “product_cat” value on taxonomy name field. In this case, it should be like this :
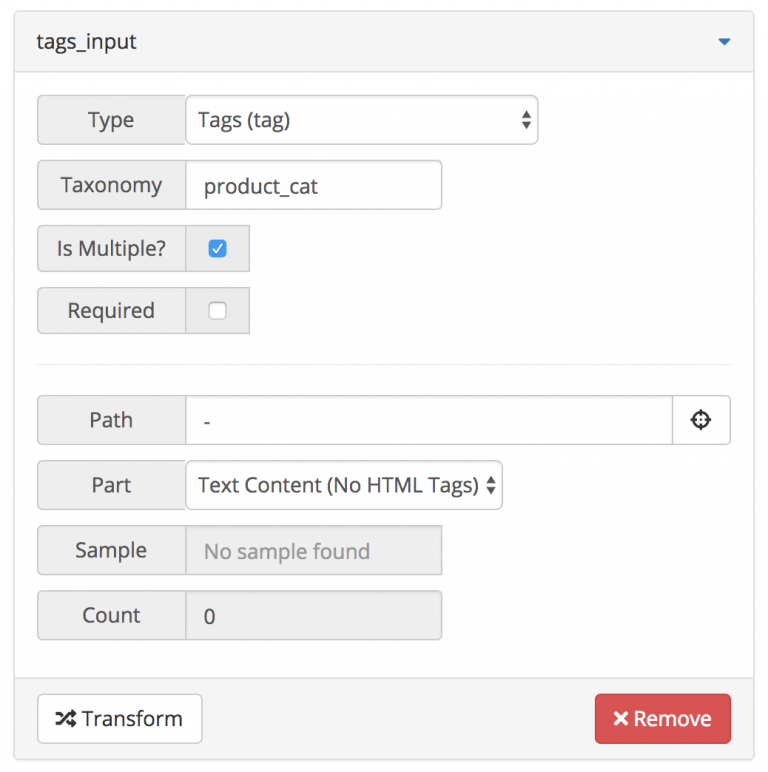
With this way, you’ll be able to create custom categories on a custom taxonomy structure. This method can be used for any plugin that uses custom category taxonomy structure.
Attachments:
You must be logged in to view attached files.Suman M.KeymasterScraper detects all custom fields automatically. You need to create empty post with filling all custom fields. Scraper will capture all custom fields from this empty post.
Plugin is unable to detect all custom fields because of WordPress’s limitations. But creating empty post, plugin can detect all variable names.
You can see your custom fields on data fields list with creating a new data field. Custom fields can contain multiple values. In that case you should also enable JSON formatting in transform settings > database.
Some plugins stores information in separated databases. For example GeoDirectory plugin shows values as a custom field but they are actually in a separated database. In those cases Scraper won’t shows these fields. Please make sure the plugin you use on your website stores information on custom fields.
You could also define custom field name on Transform > Database section. There is a field called “Database Name”. With changing it, you could update your custom field key.
Plugin doesn’t support some fields on Advanced Custom Fields plugin. (For example repeater data type)
Suman M.KeymasterIntroduction
It’s possible to define special conditions for products. If you want to only get products that’s in a price range, you should define special conditions.
Special conditions only works with variables, so it’s not possible to define for any field like WooCommerce’s _price custom field or post_title. Please make sure that you have separated variable only for special condition.
After creating your variable on data fields, please also make sure that mathematical functions are enabled for performing special conditions. You could enable that function on “Transform” functions. To enable, please click “Transform” button, go to “Math Functions” section enable “The content is numerical, enable math functions.”
You could define special conditions on project settings. There is a section called “Conditions”.
Please make sure that special conditions only EXCLUDES the product. All conditions designed to exclude content.
Expressions
There are three different conditions that can be performed by plugin.
Greater
Plugin will check if the variable is greater than a number. Please use “>” symbol to perform this function.
Lower
Plugin will check if the variable is lower than a number. Please use “<” symbol to perform this function.
Equal
Plugin will check if the variable is equal to a number or a value. Please use “=” symbol to perform this function.
Expression’s Left-side
It’s possible perform some mathematical functions on expression’s left side. You could define multiply, divide, addition and extraction functions.
Here is the list of mathematical functions (with examples) :
- Multiply : @price_value * 0.5
- Divide : @price_value / 3
- Addition : @price_value + 12
- Extraction : price_value – 4
A Full Example for Special Condition
This example checks if product’s price value’s half is greater than the regular price value.
@price_value * 0.5 > @regular_price_variableIf you define this expression on special conditions, plugin will exclude products that provides this condition.
Suman M.KeymasterTo define a product attribute on Scraper, you should create an attribute on Woocommerce. You could create attribute with following introduction :
- Go to Products > Attributes menu on WooCommerce.
- Name your attribute and click “Add Attribute” button on form.
- After creating attribute, it will appear on the list beside the form. Click your attribute’s name from this table.
- It will redirect you to product attribute page. The page has an URL structure that has taxonomy variable. It will be like this : wordpress/wp-admin/edit-tags.php?taxonomy=pa_color&post_type=product
- Copy this taxonomy value to use on Scraper. In this case, we copied “pa_color” name.
Now, you have defined product attribute on your WooCommerce system. We could go to Scraper and setup our product attribute field.
- Click “Add New Data Field” button on data fields list.
- Select “Product Attribute” from that list.
- Paste your attribute taxonomy on “Name” field which is “pa_color” in our case.
- Select your path with visual editor and transform your input if needed.
Suman M.Keymaster- On “Post Content” section click “Add New Data Field” button.
- Select “Product Categories” from data type list. It’s labeled “Type”.
- Select your path with visual selector.
- Transform your input content if needed. (In some cases you need to split content with delimiter, you could do that on transform functions)
After that visual editor will set taxonomy as “product_cat” which is a tag taxonomy for Woocommerce. You’ll also notice that “Is Multiple?” option is checked. Plugin checks this option because tax taxonomy only accepts array value on database.
Suman M.Keymaster- On “Post Content” section click “Add New Data Field” button.
- Select “Product Tags” from data type list. It’s labeled “Type”.
- Select your path with visual selector.
- Transform your input content if needed. (In some cases you need to split content with delimiter, you could do that on transform functions)
After that visual editor will set taxonomy as “product_tag” which is a tag taxonomy for Woocommerce. You’ll also notice that “Is Multiple?” option is checked.Plugin checks this option because tax taxonomy only accepts array value on database.
Suman M.Keymaster- Scraper gets all custom fields from already created posts. To enable WooCommerce’s custom fields, you should create an empty product with filling these fields. For example if you need to fill “price” field on Woocommerce, you should fill this field with anything before create your task on Scraper.
- After creating your empty product, Scraper will display all possible fields for your task. You could add any custom field on data field list.
Suman M.KeymasterIt’s possible to create Woocommerce products (simple) with Scraper. After installing WooCommerce you can follow the instructions below to create a task on Scraper to import products.
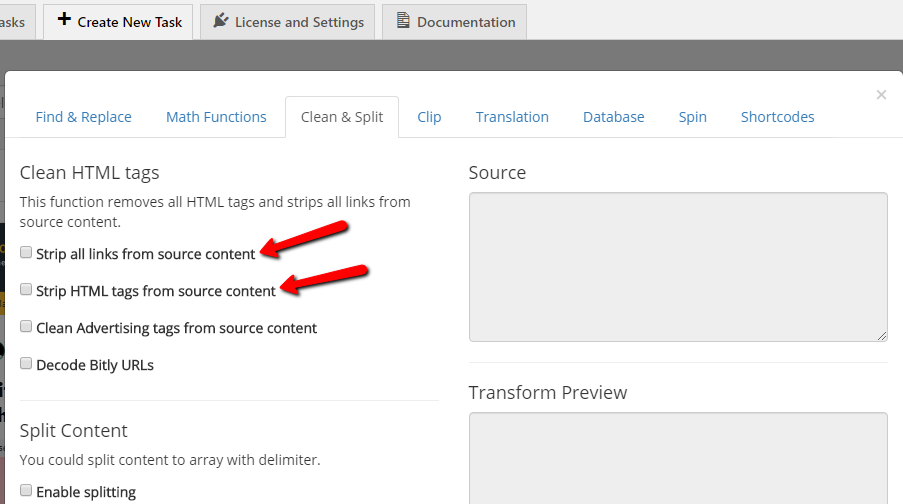
Suman M.KeymasterYou can fetch the content as either plain text or with HTML codes. You can set Part field according to your need.
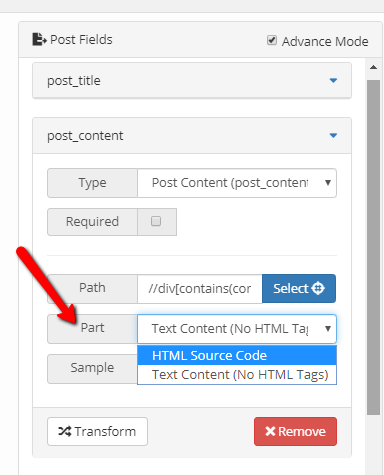
If you want HTML tags be retained in the content being scraped then make sure that these 2 options in ‘Clean & Split’ tab are disabled/unchecked:
Attachments:
You must be logged in to view attached files.Suman M.KeymasterIn this page, we list useful regex expressions. You could use regex expressions on find and replace methods.
Getting First Paragraph
For post content, plugin automatically gets all paragraphs. If you want to get only first paragraph, you could modify post_content’s xpath expression like this :
//div[contains(@class, “description”)]/p
Simply adding
[1]at the end, will provide us only first paragraph.//div[contains(@class, “description”)]/p[1]
Reordering any data
(.*?) means everything on regex. If you have a time format like 01-12-1995, you could capture it like this :
(.*?)-(.*?)-(.*?). On find section, you should write that to capture all time format. On replace section, you could reorder this information. For example,$2-$1-$3will return you 12-01-1995. 1, 2 and 3 means their order.Cleaning empty lines
With this regex expression, you could remove any empty line from your content. Leave replace field empty and paste to find field this :
^[ \t]*$\r?\nTrim or remove empty spaces
With this expressions, you could trim your content on the left and right side. Leave replace field empty and paste to find field this :
^[ \t]+Get Last Word From String
You could get last word from string with find&replace expressions.
Find :
(.*)\s(.\w*)
Replace :$2 -
AuthorPosts