Forum Replies Created
-
AuthorPosts
-
 Suman M.Keymaster
In Scraper, it’s possible to modify post content. In this tutorial we’ll add read more link to post content. You could use same methods to add logo or any other HTML element for your fields.
For read more link, we need URL of post. In Scraper, they are already included in system and they can be used as a Scraper variable. The source URL can be used on content with
{{source_url}}variable. You could add this shortcode to your post content in transform menu.Please watch video below for adding read more link to your post.
Suman M.KeymasterIt’s possible to get any attribute of iframe element with Scraper. In this tutorial, we’ll create a field that allows to get iframe element on our content. Please follow the introductions below :
- Create a data field to get iframe element. Select “Custom Variable” and name it like ‘ iframe_video ‘
- Type //iframe on xpath field.
- After that, plugin will automatically fetches the iframe source attribute.
- Select “attr:src” from properties list.
- Rename your data field to “iframe_video”
- Go to shortcodes section and type :
<iframe src="{{content}}" width="100%" height="300"></iframe> - Now you have {{iframe_video}} variable, you could simply put your video to post_content field on shortcodes section.
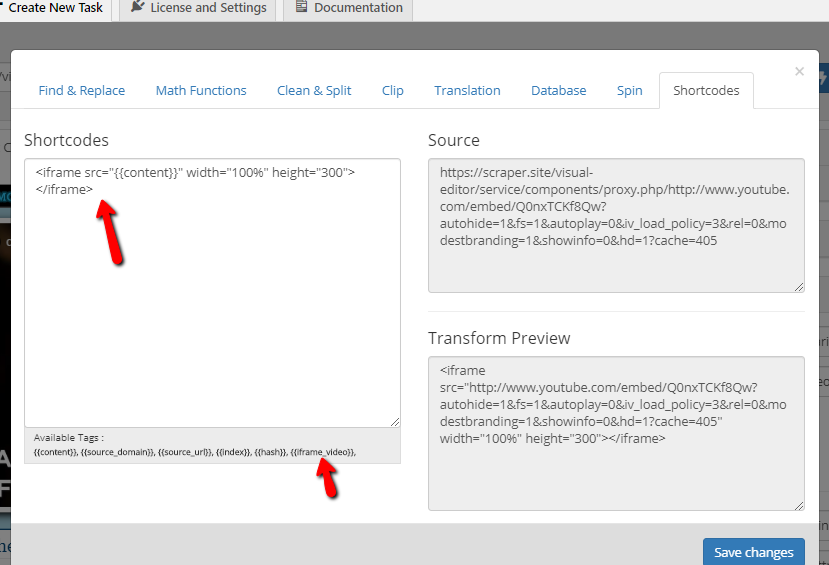
If you iframe has special attributes, you could simply apply all of them.
Attachments:
You must be logged in to view attached files.Suman M.KeymasterIt’s possible to create dynamic shortcodes for WordPress. You could use these shortcodes anywhere. Like Tablepress, visual editor, in posts or widgets.
Please watch our tutorial video to create your own shortcode.
Step by step explanation :
- Create a shortcode variable on data fields.
- Define path and make sure it works properly.
- On project save, select “Update and create shortcodes” for task processing method.
- After saving and returning scheduled tasks. Click “Update” button for task to get shortcode from post fields.
- Copy your shortcode and paste it anywhere on WordPress.
- Trigger your task to render with latest variable on shortcode.
December 30, 2019 at 8:43 am in reply to: Using Cookies (scraping from password protected site) #1080Suman M.KeymasterSome websites requires authentication. In this case you could use your own cookies to login to website with Scraper.
To get your cookies please follow instructions below :
- Go to website you are going to scrape and login normally.
- After sign in, right-click to anywhere in page and click “Inspect” button.
- Go to “Application” section on inspector menu.
- Click the “Cookies” button on sidebar.
- You’ll see the list of cookies that currently in use by this website.
- Copy the “Name” and “Value” fields from this list and combine them like this : Name=Value;
Example
1- Copy cookie name and value from inspector tool.
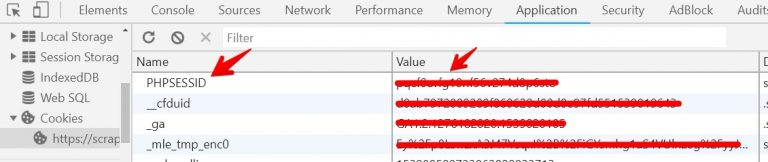
2- Combine values like this : PHPSESSID=valuesample;
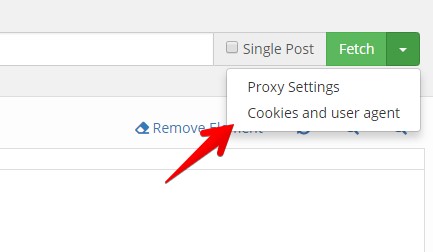
3- Open the menu on Scraper visual tool.
4- Copy the cookie string on this field.
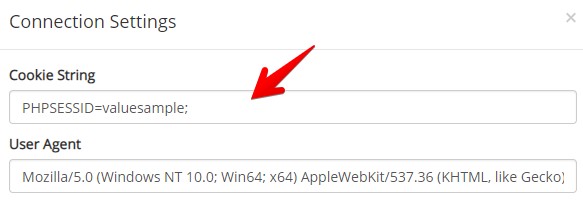
After fetching page again, you’ll see that it will be signed in to source site. Scraper will use these cookies on scraping process as well.
Attachments:
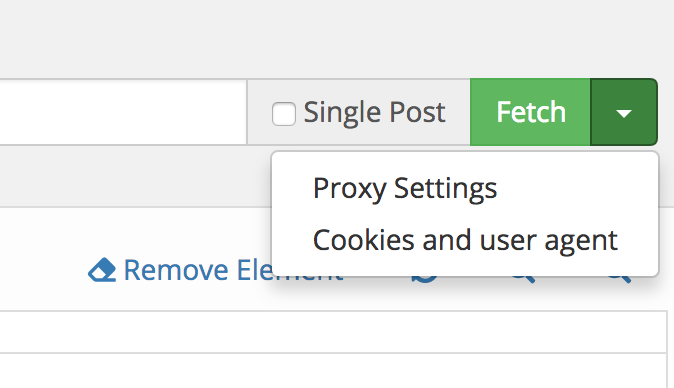
You must be logged in to view attached files.Suman M.KeymasterBesides the “Fetch” button there is a dropdown menu for proxy and cookie settings. Click on this button and click on “Proxy Settings” to open settings.
On proxy settings form you could setup proxy with IP and port.
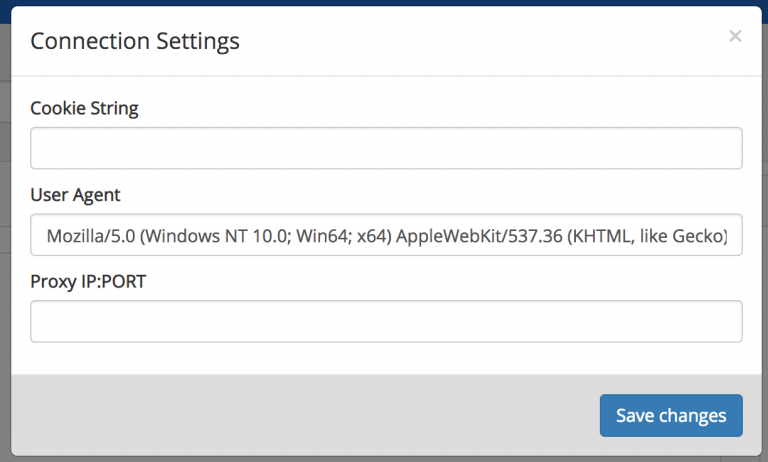
If you have private proxy, it should be in this format :
username:password@ip:port
Visual tool supports proxy, you could test your results on preview page.
Attachments:
You must be logged in to view attached files.Suman M.KeymasterYou can also scrape from XML or RSS feeds. Please check the following video tutorials:
Tutorial I:
Tutorial II:
Suman M.KeymasterIf you have the list of URLs, you could scrape them with bulk URL functionality. Bulk URL feature works with single-post method.
Paste any URL from your URL list and create scraping template with this URL on visual editor. After creating your model, paste the URL list on bulk URL field and click save changes button. Plugin will scrape other pages with using this template.
The list should be separated with line-breaks. Plugin scan maximum 500 URL on each task.
After enabling single-post option, bulk URL list button will appear.

Pagination Generator
If the URLs contains numbers with linear order. You could use pagination generator to create an URL list.
With pagination generator, you could generate bulk URL list with defined range. You should enter
{{number}}as a dynamic variable on your URL, and generator will process and replace number variable with page numbers.For example we have an URL like this : https://google.com/page=1
If you want to generate URLs with with this scheme, you could simply type
https://google.com/page={{number}}in the input. Generator will generate bulk URL list with defined URL scheme.Attachments:
You must be logged in to view attached files.Suman M.Keymaster- After installing plugin go to Scraper > “Create New Task” menu.
- Enter the URL of source website and click fetch button.
- If you need to scrape single page (it’s for creating one post or updating already created post), then check “Single Post” button.
- If your post has serial links like posts, products, click the “Select” button on sidebar. This tool is called selector, click with this tool on the post or product title to define serial posts.
- Check samples for serial scraping and make sure item count is correct.
- You are done with serial scraping definition. Click on “Post Content” from tabs.
- Plugin automatically asks if it’s a post or product. You could select one of them, or simply click on “Advance Mode” to build your post structure.
- All process is same on this section. You could define post title, post content, category or featured image with “Select” button.
- After completing your scraping model, go to preview section and run your model if it runs properly.
- Click on “Save Project” button, select your post type, name your task and save it.
- You could run your task on scheduled task list.
Please watch this video for a simple setup process.
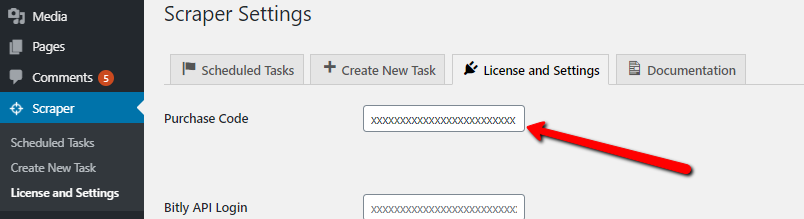
Suman M.KeymasterYou can either auto update the Scraper plugin or manually update it like any other plugin. Make sure that Scraper purchase code is entered under ‘License and Settings’ tab so that you are notified about new updates if any.
In both the cases, your previous settings will remain intact.Suman M.KeymasterIf you have finished installation of Scraper plugin you should go to the settings page (Dashboard >> Scraper >> License and Settings), enter your purchase code and save it. To activate your plugin, you should enter the purchase code. You’ll get purchase code with after purchasing plugin on Codecanyon. Envato will send you an email that contains purchase code. Please DO NOT share your purchase code publicly.
You can also enable third party libraries here.
Bit.ly Integration
Scraper can decode any bit.ly link after scraping content. This may be useful if you want to add your affiliate link with decoding shortened link. To install bit.ly you should get Bit.ly API access for your website. You could get access credentials from this web site : https://dev.bitly.com/
Notes regarding bit.ly : Please make sure the bit.ly URL you are going to scrape has to be in a variable and it should has “http” scheme. You could simply replace “https” with “http”.
Google Translate
You can use Google’s Official Translation API on your scraping processes. You can get API keys from this link : https://cloud.google.com/translate/
Please note that Google has changed their service and it’s paid service now. Please see their pricing list at : https://cloud.google.com/translate/#pricing-summary
Yandex Translation
You can alternatively use Yandex’s Translation API on your works. It has free plan options.
Please get your Yandex Translation API key from this URL : https://tech.yandex.com/translate/
Enable Error Reporting
If there is a problem on your tasks, you can enable error reporting and determine issue. Error reporting simply enables PHP errors for process and dumps the error output on your screen. You can use “Trigger Once” button to see errors after running task.
Disable Memory Limit
If your hosting limits memory, you could simply disable memory limitations for your tasks. This method doesn’t recommended, it may cause some problems on your web server if you have a real-time traffic.
Attachments:
You must be logged in to view attached files.Suman M.KeymasterThe manual installation method involves downloading our plugin and uploading it to your webserver via your favorite FTP application or Hosting Control Panel.
- Download the plugin file to your computer and unzip it.
- Using FTP program or your Hosting Control Panel, upload the unzipped plugin folder “scraper” to your WordPress installation’s /wp-content/plugins/ directory.
- Activate the plugin from the Plugins menu within the WordPress admin.
Suman M.KeymasterAutomatic installation is the easiest option as WordPress handles the file transfers itself and you don’t even need to leave your web browser. For automatic installation of Scraper, log in to your WordPress admin panel, navigate to the Plugins menu and click Add New. Click Upload and choose plugin zip file from your computer, then click Install Now and enjoy.
Suman M.KeymasterAuthor: wpBots
Author URL: https://codecanyon.net/user/wpbots
Plugin URL: https://codecanyon.net/item/scraper-automatic-content-crawl-and-post-plugin-for-wordpress/22458136Minimum Requirements
WP version: 3.4+
Tested up to: Latest WP
PHP Version: 5.4+
Recommended: PHP memory limit 512M minimum, max execution time 300 seconds minimum (depending on number of items to be scraped) -
AuthorPosts